LabeLase® Producer

Tutorial - Printing Data from an Excel® Spreadsheet


Introduction

Version 2.x and higher of InfoSight's LabeLase Producer can read data directly from an Excel spreadsheet and use it to print tags. Most businesses have access to Microsoft's premier spreadsheet application, and for those who don't, the open-source (and free) OpenOffice suite can easily create spreadsheets in the Excel file format.

Note that since Version 2.x of Producer it is no longer necessary to have Excel installed on the computer running Producer, as Producer can read XLS and XLSX files directly.


Tag Layout

The first step in creating your Excel data file is to identify the fields on your tag that will be receiving the data. Not all fields on a tag layout have to be included in the data file. Some fields (like your company name, for instance) never change and are considered "constant" or "fixed". Other fields have to have different data on each tag and must therefore get the data from your data file.

This is a sample tag layout created for our LabeLase® Designer tag layout tutorial showing a tag with many data fields. Note that some of these fields such as the words "SIZE:" and "LENGTH:" are fixed fields that never change from tag to tag. Others, like "#43 METRIC (#14 BAR)" and "64FT 6.00IN" are different (or can be) on each individual tag. These variable fields are the ones you need to include in your Excel spreadsheet. We will add the other, fixed, fields to your layout so that they don't change.

Note that we will create the barcode fields by linking to the other text fields on your layout and in your data file. If the data to be encoded in the barcode does not come from the other text fields, and it cannot be derived from those fields, then you will need to add an additional column to your spreadsheet specifically for the barcode. If you are unsure, please contact your InfoSight sales representative or the factory for assistance.


Rows and Columns

Once you have identified the fields that will be required to receive data from the data file, you can begin to build your Excel spreadsheet.

Columns - Each field in your tag layout requires a column in the spreadsheet. We recommend that the first row in the spreadsheet contain the name of each field in its respective column. This will help match your spreadsheet format to the tag layout that that will receive the data. Although you aren't required to have the field names in the first row, it can help to reduce the chance for errors when you print your tags.

Rows - Each tag that you want to print requires a row in the spreadsheet. As producer processes your spreadsheet, it will take each row of the file one at a time and directly substitute the contents of each column with the associated field in your tag layout. Thus, each row in the spreadsheet corresponds to one tag job. If you wish to print more than one copy of the tag, see the next section.

In the example shown above, the Excel spreadsheet contains 6 rows of data. The first row simply has the name of each field to help identify the data in the file to the fields in your layout as shown below.
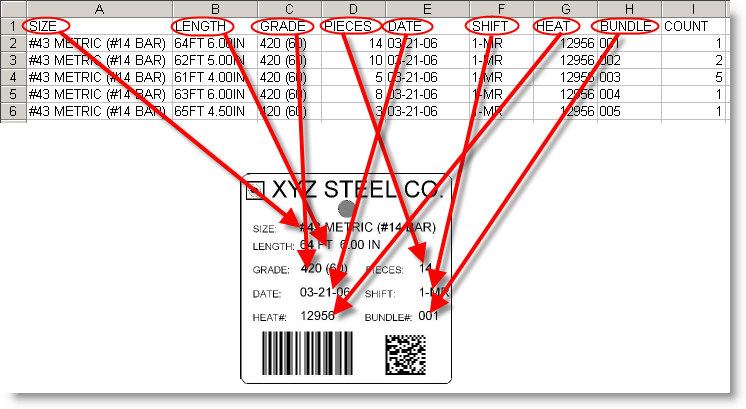
Note that column 'I' is labeled 'COUNT' and contains a number that does not correspond to any fields on the tag layout. This is an extra field used to control the number of tags that can be printed for each row of data in the file. This is explained in more detail in the next section.


Printing Multiple Copies of Each Tag

Normally, each row of your spreadsheet corresponds to one printed tag. If you want more than one copy of the same tag, it seems logical that you can just repeat the same row as many times as you need. You can do it this way if you wish, but that can result in a lot of duplicated data and large file sizes. Fortunately, there is another, better, way of printing multiple copies of each tag.

Once you have created a column in your spreadsheet for each field in your tag layout, add an additional column to the right of the last data column. This column is the "count" column, and you can label it such in the first row of your file, if you wish. You simply put into this column the number of tags that you want to print using that row's data. You can even have a different count for each row if you want, it's completely up to you.


Tips and Tricks

Here are some tips that will make it easier for you to create your spreadsheet that will minimize any problems.

  • If you are going to use a 'count' field, make sure it is the last column in the spreadsheet.
  • Remove any comma (",") characters that may be in your data.
  • Do not use hidden rows or columns in the spreadsheet. Hidden rows will result in extra tags that you may not want.
  • Do not use multiple pages or workbooks in the spreadsheet. Make sure all your data is on the first page.
  • Do not include formulas, functions or any other non-text data.


Copyright © 2021 InfoSight Corporation All Rights Reserved
InfoSight® is a registered trademark of InfoSight Corporation
Excel® is a registered trademark of Microsoft