Introduction
Many InfoSight industrial marking systems have an Ethernet port to connect them to a user's network. These systems use TCP/IP sockets to communicate with the system's PLC and/or plant automation system. Usually, InfoSight provides the program in the PLC that sends data to the marker over this communications link and the end user doesn't have to deal with the details of the socket link. However, in some cases the end user needs to establish a second connection to the marking system in order to perform some bit of side-channel communications such as changing a parameter setting or downloading a message to be marked. The Sample Extended Protocol Application is a simple demonstration of how this communications link can be accomplished.
License
This sample application and all of its source code is released under the open source MIT license. See the license document license.txt supplied with the package or go to https://opensource.org/licenses/MIT for more information.
Installation
Download the sample application source code and copy the ZIP file to a folder on your Windows computer. Unzip the contents of the archive, keeping the original file structure. The software is supplied as a Microsoft Visual Studio 2010 project written in the C# .NET programming language. You will need to install Microsoft Visual Studio on your computer to compile the sample application. If you are only interested in the example source code then you won't need the Microsoft tools.

Extended Protocol
Communications with the InfoSight marking system takes place over the Ethernet network using standard TCP/IP sockets. On top of TCP, as the application layer protocol, is the InfoSight Extended Protocol. The Extended Protocol is standard on most InfoSight printers and marking systems and allows bi-directional exchange of data and control commands. Documentation for the generic protocol and for application specific implementations can be found here:
Extended Protocol Communications - basic messaging format
InfoDent® 8400 Industrial Dot-Peen Stamping System
I-Dent® Industrial Spray Marking System
InfoTag® KE2853 Automatic Tag Printer
Running the Program
The sample program is written in C# .NET and requires the .NET Framework V4 to execute. The executable is found in the \SampleExtendedProtocolApplication\bin\Debug folder and is named SampleExtendedProtocolApplication.exe
The program is a Windows Forms application and demonstrates three instances of communicating with an InfoSight marking system. The program's main form looks like the figure below:
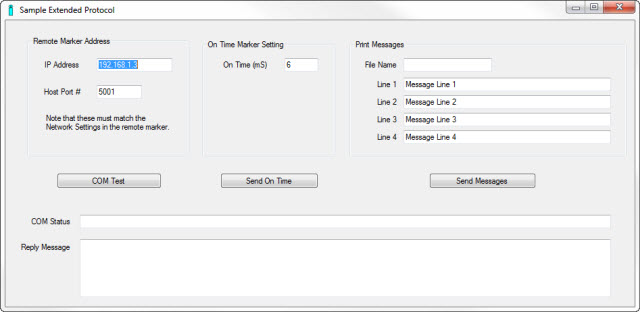
Remote Marker Address
The first thing you must enter is the IP address of the marking system to which you are trying to communicate with. Along with the IP address of the marker, you have to specify the port number that the marker is listening to for communications requests. Together these two settings allow the sample application to create a "socket" connection to the marker using the standard TCP/IP communications protocols. The values you enter here must exactly match the settings in the marker's Network Setup as shown below.
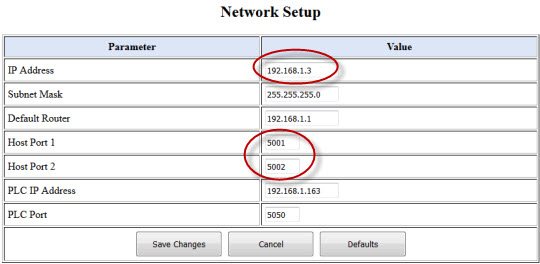
This screen-capture shows the marker's IP address matching the setting in the sample application. It also shows the two possible settings for Host Port #. The Host Port setting in the sample application must match one of these port numbers in the marker's network setup. In this example, port 5001 is selected.
Once you have entered the correct IP address and Port Number setting, you can click the COM Test button to check the communications link. The sample application will attempt to connect to the marking system using a TCP/IP socket. If the socket is established, the sample application will use the InfoSight Extended Protocol to send a message requesting the marker's firmware version number. A snippet of the source code that does this is shown below:
            string  reply_text  = "";
            string  error_msg   = ExtendedProtocolSynchronousClientSocket.SendMessage(RemoteIPAddressTextBox.Text,
                                                                                        Convert.ToUInt16(RemotePortNumberTextBox.Text),
                                                                                        (byte)'V',
                                                                                        "",
                                                                                        out reply_text);
This code, copied from the source file SampleExtendedProtocolForm.cs uses the settings from the IP address and Port Number text entry boxes to call the SendMessage function of the ExtendedProtocolSynchronousClientSocket class. This is a blocking call, meaning that the function will not return until the entire communications sequence is completed. The third parameter to the function call is a single ASCII character letter 'V' that is the Extended Protocol message type. For InfoSight marking systems, message type 'V' is used to request the firmware version number. This particular message type does not require any additional data, so the fourth function parameter, the Data Text, is empty (a null string.) The last parameter to the function call is an "out" parameter and is a string that will hold any reply from the marking system. In this case, the reply should contain the actual firmware version text from the marker. When the call completes successfully, the program will display the firmware version string in the Reply Message field. If an error occurs in the process, the error message will be displayed in the COM Status field.
On Time Marker Setting
This entry field and its associated Send On Time button are used to send the head driver "on time" setting. Enter a valid number (typically a number between 5 and 12) indicating the time in milliseconds that the drivers are turned on. The source code below shows the call for this example:
            // Convert the text entry for on-time into an unsigned integer and then
            // back into a text string. This will ensure the input is a valid number.

            UInt16  on_time_value   = Convert.ToUInt16(OnTimeTextBox.Text);
            string  on_time_str     = on_time_value.ToString();

            // Build the message text. This consists of the parameter group name "MKR"
            // and the parameter name for on-time "O1". A TAB character separates the fields.

            string  message_text    = "MKR\tO1=" + on_time_str;
            string  reply_text      = "";
            string  error_msg       = ExtendedProtocolSynchronousClientSocket.SendMessage(RemoteIPAddressTextBox.Text,
                                                                                          Convert.ToUInt16(RemotePortNumberTextBox.Text),
                                                                                          (byte)'P',
                                                                                          message_text,
                                                                                          out reply_text);
Here we convert the user entered on-time string into a numeric value, which tests to ensure it is a number, and then back to a string for transmission to the marker. This conversion from and to a string is a simple way to make sure that the entered value is a valid number and is thus compatible with the marker. Note that in this example no validity checks were made to ensure that the resulting on-time value is sane for the application. This is left as an exercise for the reader.
The message type for this packet is 'P' indicating it is a Parameter message. The message text field consists of the parameter block name "MSG", a TAB character separator, and the on-time field name "O1=" followed the the on-time value. The reply to this message should be an empty string.
Print Messages
The last example allows you to send print messages and an optional message file name to the marker. Leaving the file name field blank will instruct the marker to use its currently "assigned" message file. If you do enter a file name, make sure it is a file that is already configured on the marker.
            string  message_text    = MessageFileNameTextBox.Text + "\t" +
                                      MessageTextBox1.Text + "\t" +
                                      MessageTextBox2.Text + "\t" +
                                      MessageTextBox3.Text + "\t" +
                                      MessageTextBox4.Text;

            string  reply_text      = "";
            string  error_msg       = ExtendedProtocolSynchronousClientSocket.SendMessage(RemoteIPAddressTextBox.Text,
                                                                                          Convert.ToUInt16(RemotePortNumberTextBox.Text),
                                                                                          (byte)'0',
                                                                                          message_text,
                                                                                          out reply_text);
When sending the message data, simply use message type '0' (ASCII zero character) and the message text is a TAB delimited list of the file name and the text strings to be printed. The reply will echo the message you send, allowing you to confirm the data (not shown in this sample.)
Sockets
The sockets used in the sample application are of the synchronous type. This means that the calls into the socket to send and/or receive data are blocking and will not return until the process is complete. Synchronous sockets are much easier to code than the asynchronous type so we chose that method for the example code. Your application may or may not be suitable for synchronous communications, but this is a good place to start with sockets in any case. Coding the same application using asynchronous sockets is possible but is left as an exercise for the reader.
Conclusion
If you find it necessary to establish a direct connection to an InfoSight marking system over an Ethernet network, TCP/IP sockets is the way to go. We provide an open source sample application with three examples of sending and receiving data to/from an InfoSight marking system.
Technical details are subject to change without notice.