Part 3
Introduction
In part 1 of this series we created the tag layout using LabeLase® Designer, including the Operator Data Entry table that will accept information from our spreadsheet and link it to the fields in our layout. In part 2 we continued the process by preparing our spreadsheet. In this, our final part, we conclude by showing the process of importing the spreadsheet into Producer to print our tags. For a recap, see Part 1 and Part 2.
Opening the Layout
Before we import our spreadsheet data we need to open the layout that is going to accept the data. In part 1 of this series we described the process of creating a layout, so that's the file we are going to use for printing. From the main Producer window, pull down the File menu and select Open. A dialog will appear allowing you to locate and select the layout file we previously created. Be sure to set the "Files of type" pull down to "All Layout Files".
After you open the file, an image of the layout will appear in the upper left corner of the Producer window. Just below that image will be the Operator Data Entry table that we created in part 1. Remember that the columns from our spreadsheet will be applied to the rows of the Operator Data Entry table on a one-for-one basis.
Make sure that the Job Queue is empty before we proceed with opening the spreadsheet. You may have to click the Clear Jobs button just above the list of jobs in the queue. Starting with an empty queue will ensure that we print exactly what we are expecting.
Opening the Spreadsheet
Now it's time to import our spreadsheet data. We do this by loading the spreadsheet data file and using its contents to create jobs in the job queue.
From Producer, once again pull down the File menu and select Open. The same dialog will appear as when we opened the layout file, but this time we want to find and open our spreadsheet. To do this, change the "Files of type" pull down to Excel Spreadsheet (*.xls, *.xlsx) instead of layout files. Now navigate as needed to the folder where your spreadsheet is located, click the spreadsheet file name and then OK.
Note that in version 2 of Producer it isn't necessary to have Excel installed on the same computer as Producer. The older version 1.x Producer had this requirement, but new Producer can directly read Excel spreadsheet files of both the classic format xls and the newer XML formatted XLSX files.
After selecting your spreadsheet file, Producer will show you the Open Data File dialog with your spreadsheet already loaded.
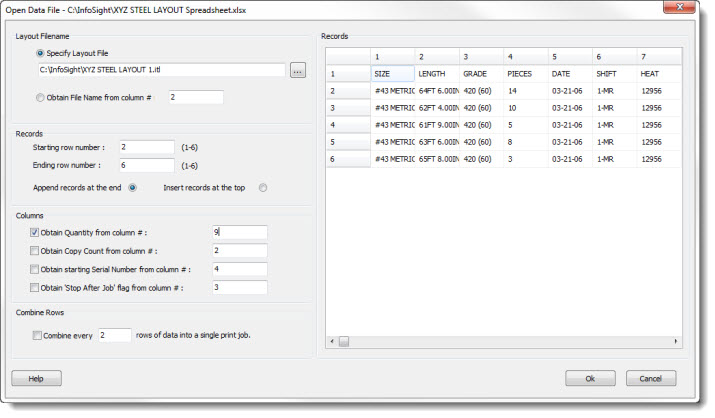
Layout Filename
You can specify the name of the layout file to use to print the records in the spreadsheet or indicate that the layout file name is contained in one of the columns of the spreadsheet. In our example, we are going to use the layout that we already loaded, which is selected for you by default.
Records
You must tell Producer which records from the spreadsheet you want to print. You do this by specifying a range of rows, beginning with a starting row number and finishing with an ending row number. All of the rows in the spreadsheet between these row number, inclusive, will be printed. In our example, the first row is actually used a for column headers, and we don't want to print any tags with that. So we specify that the starting row number will be row 2, which is the first row with actual data. We leave the ending row number at 6, which Producer helpfully filled in as the last row in the spreadsheet that contained data.
Finally, you must indicate how you want these new records added to the job queue. Normally, you would just add all of these new records to the end of the job queue, so you would select the Append option. Any records already in the job queue will print first, followed by these new ones. However, you do have the option to print the new records before anything else by selecting the "Insert at the top" option. This allows you to prioritize your workflow if necessary.
Columns
Several options are provided that allow you to use certain columns for special cases. For example, in our spreadsheet the last column, number 9, is not text to be printed but is actually a tag count. By checking the box "Obtain Quantity from column #" and entering 9 in the data field, we are telling Producer that it should use the ninth column to specify the number of tags to print for each row in the spreadsheet.
Since our spreadsheet only contains one special column for the quantity, we will leave the other check boxes unchecked. If you need to specify things like Copy Count, Serial Number, etc. then include the appropriate columns in the spreadsheet (to the right of your last data column) and then check the appropriate boxes and enter the column numbers.
Combine Rows
With some specific LabeLase® printer models, such as the JM410, you can actually print more than one tag in a single print operation. In these cases, you may want to combine multiple rows of spreadsheet data, where each row represents one tag in the print batch, into a single print operation. To do this, just click the box to combine rows and enter the number of rows to be combined. We don't need this feature for our example, so we leave that box unchecked.
Records
This section of the dialog is a grid showing you all of the data that was extracted from the Excel spreadsheet. The data is shown here for two reasons: 1) It allows you to confirm that the file you opened was the correct one by visually inspecting the contents, and 2) you can manually change the data in each cell if you need to, just in case you need to make any last minute changes.
Once you are satisfied that your settings and data are correct, click the OK button. This will close the dialog and add new records to the Job Queue.
Job Queue
On Producer's main window, you should now see all of the records you selected entered as jobs in the Job Queue. Each job corresponds to one record from the spreadsheet.
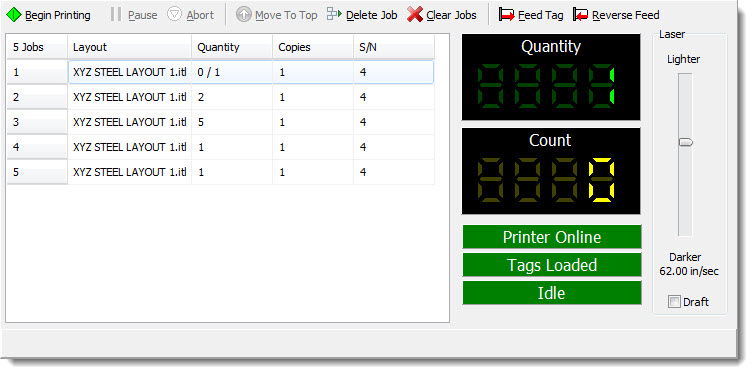
As you can see in the image above, we now have all five records from our spreadsheet entered as jobs in the queue. Each job obtained its count from the COUNT column of the spreadsheet. The data to be printed is contained within each job, which you can confirm by double clicking the job entry. Now, it's simply a matter of ensuring that the printer has enough tags loaded to handle all the jobs and clicking the Begin Printing button.
Conclusion
This concludes the third and final installment of our series on printing tags from an Excel spreadsheet with LabeLase® Producer. If you have any questions or need help printing tags from a spreadsheet, please Contact Us.
LabeLase is a registered trademark of InfoSight Corporation
Excel is a registered trademark of Microsoft