Part 2
Introduction
In part 1 of this series we created the tag layout using LabeLase® Designer, including the Operator Data Entry table that will accept information from our spreadsheet and link it to the fields in our layout. In part 2 we continue the process by preparing our spreadsheet. For a recap, see Part 1
Rows and Columns
Once you have identified the fields that will be required to receive data from the data file, and you have created your corresponding tag layout, you can begin to build your Excel spreadsheet.
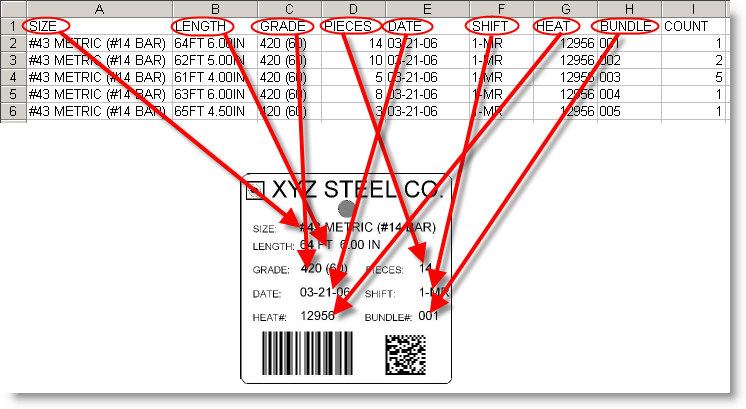
Columns - Each variable field in your tag layout requires a column in the spreadsheet. You must create your columns to exactly match the rows in the Operator Data Entry table we just created. If you look at the image below of a spreadsheet you will see that the fields (SIZE, LENGTH, GRADE, etc.) are in the exact same order as the entries in the table. This is very important, since Producer simply copies the spreadsheet columns left-to-right into the Operator Data Entry table top-to-bottom. In the example spreadsheet shown below you will notice that there is a ninth field called COUNT that follows the BUNDLE field, but there is not an entry in the table for COUNT. This is because the count value is not actually printed on the tag, but it will be used to control the number of tags that Producer will print for each row of the spreadsheet. If you are going to have your spreadsheet control the tag count, and you don't have to if you don't want since it is an optional feature, make sure the count field is after (to the right of) all your other fields.
We recommend that the first row in the spreadsheet contain the name of each field in its respective column. This will help match your spreadsheet format to the tag layout that that will receive the data. Although you aren't required to have the field names in the first row, it can help to reduce the chance for errors when you print your tags. When you import the file into Producer, you can tell it so skip the first row so your column headings won't be printed.
Rows - Each tag that you want to print requires a row in the spreadsheet. As Producer processes your spreadsheet, it will take each row of the file one at a time and directly substitute the contents of each column with the associated field in your tag layout. Thus, each row in the spreadsheet corresponds to one tag job. If you wish to print more than one copy of the tag, see the next section.
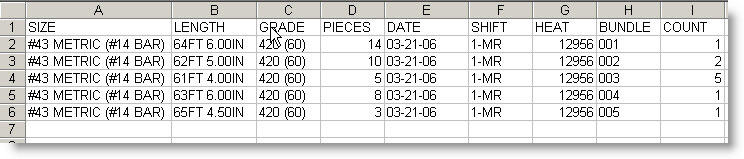
In the example shown above, the Excel spreadsheet contains 6 rows of data. The first row simply has the name of each field to help match the data in the file to the fields in your layout as shown below.
Note that column 'I' is labeled 'COUNT' and contains a number that does not correspond to any fields on the tag layout. This is an extra field used to control the number of tags that can be printed for each row of data in the file. A count field is optional and if you omit it then each row from the spreadsheet will only print one tag. This is explained in more detail in the next section.
Printing Multiple Copies of Each Tag
Normally, each row of your spreadsheet corresponds to one printed tag. If you want more than one copy of the same tag, it seems logical that you can just repeat the same row as many times as you need. You can do it this way if you wish, but that can result in a lot of duplicated data and large file sizes. Fortunately, there is another, better, way of printing multiple copies of each tag.
Once you have created a column in your spreadsheet for each field in your tag layout, add an additional column to the right of the last data column. This column is the "count" column, and you can label it such in the first row of your file, if you wish. You simply put into this column the number of tags that you want to print using that row's data. You can even have a different count for each row if you want, it's completely up to you. When you import the file into Producer, just indicate which column contains the count and Producer will use that to create the number of tags you need.
Tips and Tricks
Here are some tips that will make it easier for you to create your spreadsheet.
- If you are going to use a 'count' field, make sure it is the last column in the spreadsheet.
- Remove any comma (",") characters that may be in your data.
- Do not use hidden rows or columns in the spreadsheet. Hidden rows will result in extra tags that you may not want.
- Do not use multiple pages or workbooks in the spreadsheet. Make sure all your data is on the first page.
- Do not include formulas, functions or any other non-text data.
Conclusion
This concludes part 2 of our series on printing tags from an Excel spreadsheet using LabeLase® Producer. In part 3 we conclude the series by showing how to open your spreadsheet in Producer and create print jobs from the spreadsheet's contents.
LabeLase is a registered trademark of InfoSight Corporation
Excel is a registered trademark of Microsoft