Part1
Introduction
In a previous blog entry I described the process of preparing an Excel spreadsheet so it is compatible with LabeLase® Producer. While that article was useful in itself, it didn't provide a description of the entire process of creating the spreadsheet, building the layout and importing data at print time. This post should help you with the entire process.
LabeLase® Producer makes it easy to manually enter data into your tag layout when it's time to print tags, but oftentimes you want to print many tags from data you have saved in an Excel® spreadsheet. While it has always been possible to import and print from Excel in older versions of Producer using the XLTags feature, this method was a bit cumbersome and was often confusing. Now, with version 2, Producer can directly read the contents of your Excel spreadsheet and add your rows and columns of data directly to the print queue.
With Producer 2 you can now read the newer .XLSX spreadsheet file format, and you don't have to have Excel installed on the computer that's running Producer.
This article will walk you through the process of creating your spreadsheet so it is compatible with LabeLase® Producer.
Tag Layout
The first step in creating your Excel data file is to identify the fields on your tag that will be receiving the data. Not all fields on a tag layout have to be included in the data file. Some fields (like your company name, for instance) never change and are considered "constant" or "fixed". Other fields have to have different data on each tag and must therefore get the data from your data file.
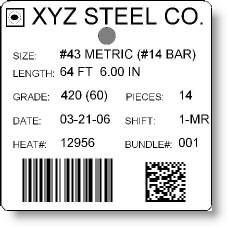 This is a sample tag layout created for our LabeLase® Designer tag layout tutorial showing a tag with many data fields. Note that some of these fields such as the words "SIZE:" and "LENGTH:" are fixed fields that never change from tag to tag. Others, like "#43 METRIC (#14 BAR)" and "64FT 6.00IN" are different (or can be) on each individual tag. These variable fields are the ones you need to include in your Excel spreadsheet. We will add the other, fixed, fields to your layout so that they don't change.
Note that we will create the barcode fields by linking to the other text fields on your layout and in your data file. If the data to be encoded in the barcode does not come from the other text fields, and it cannot be derived from those fields, then you will need to add an additional column to your spreadsheet specifically for the barcode. If you are unsure, please contact your InfoSight sales representative or the factory for assistance.
Operator Data Entry Table
When you use an Excel spreadsheet to print tags, Producer needs to know how to apply the data in the spreadsheet to the fields on the tag. It does this using a table called the Operator Data Entry table.
The Operator Data Entry table is accessed via LabeLase Designer. On the right side of the Designer screen above the list of layout fields is an icon for the Operator Data Entry table.
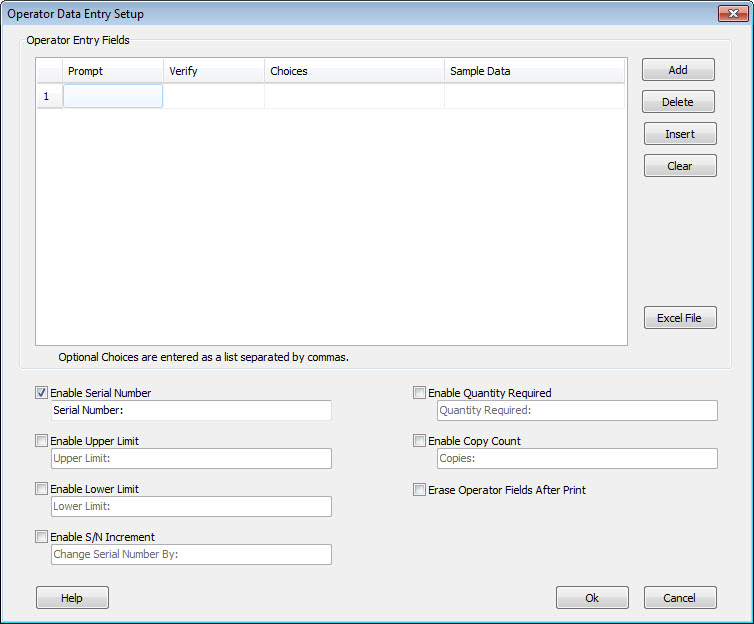
![]() Click the Operator Data Entry button, which will open the Operator Data Entry Setup window.The blank Operator Data Entry window is shown in the image below:
Click the Operator Data Entry button, which will open the Operator Data Entry Setup window.The blank Operator Data Entry window is shown in the image below:
At the top of this window is a grid that allows you to add as many fields as you need. There is no limit placed on the number of fields you can add. Buttons next to the grid allow you to Add, Delete and Insert fields and also to Clear the entire list.
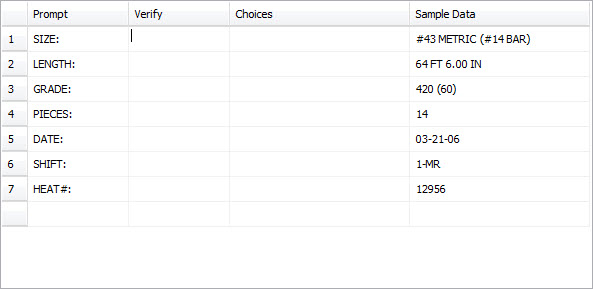
In our layout, we have seven fields that will either be entered by the operator or downloaded from another computer. Lets add the first field.
You can begin entering a new field in the empty row at the end of the list. If the list doesn't have an empty row, click the Add button and one will be added. For the first field, we enter "SIZE:" for the Prompt, leave the verify empty, and "#43 METRIC (#14 BAR)" for the Sample Data. Note that the quotation marks are shown here for clarity and are not actually entered. Continue entering fields until we have entered all seven Operator Data Entry fields.
Below the grid of data entry fields are additional fields that allow us to customize the operator interface. Each field has a checkbox that will enable the display of the field on the main Producer window. Along with the enable checkbox is a field that allows you to customize the prompt that the operator will see. For our application, we are only going to enable the Quantity Required field. The default prompts are ok, so we will keep them. Click OK to save these settings.
Once your table is complete, you need to link the table entries to the actual text fields on the layout. We do this using special flags in the fields that link back to specific rows in the table. The flags begin with a percent sign, followed by the row number in the table and then the letter 'V' for "variable". For example, the text field that we want to contain the SIZE data "#43 METRIC (#14 BAR)" will come from the first row of the Operator Data Entry table. We link to this by entering %1V into the text field itself. The text field now points to the first entry of the table, and that is where the data to be printed in that field will come from. In the same way we will link the LENGTH field to the second table entry using %2V. All of the variable fields on the tag layout will link to corresponding entries in the table in the same way.
A very detailed tutorial is available online in the Designer reference manual. It describes the process of creating the layout we are using here.
Conclusion
This concludes the first part of our tutorial on printing tags from an Excel spreadsheet using LabeLase® Producer. This series continues in part 2.
LabeLase is a registered trademark of InfoSight Corporation
Excel is a registered trademark of Microsoft